TRS-80 Emulators for Windows and MS-DOS
Matthew Reed's emulators, utilities, and development tools for TRS-80 Models I/III/4
TRS-80 Emulators for Windows and MS-DOS
Matthew Reed's emulators, utilities, and development tools for TRS-80 Models I/III/4
This program emulates two very popular early microcomputers, the TRS-80 Models I and III. It is an extremely fast emulation, written from the ground up in 8088 real-mode assembly language. Special optimization techniques were used, allowing a 16Mhz 386SX to emulate a TRS-80 at normal speed. The program also emulates some unusual TRS-80 hardware, such as a Model I doubler, TRS-80 joystick, hardware clock, and hard drive.
Note that in this document, TRS-80 refers to either a Model I or III. PC refers to the computer running the emulator. This is used to distinguish between hardware common to both types of computers, such as a TRS-80 joystick as opposed to a PC joystick.
This unregistered version of the emulator only supports a Model I emulation. The registered version can also emulate a Model III. This manual is for both versions and does mention Model III features that are specific to the registered version. If you want to use those features, then you should register.
This program will run on an IBM-compatible computer running MS-DOS 3.0, with at least CGA graphics and 300K of free memory. A hard drive, though not necessary, is practically essential for storing virtual disk files. A parallel printer, PC joystick, and SoundBlaster compatible card are also optional. Reading physical TRS-80 disks requires a disk drive that will match the disk size (generally a 5¼″ drive), and a standard floppy disk controller. It is not possible to read physical disks on a Tandy 1000. This program has been tested under Windows 95.
This program emulates a Model I and III with the following hardware:
Obviously, no emulation can ever achieve complete software and hardware compatibility. However, my emulator is very close, and can run all of the software I have tried. This includes very hardware specific programs such as Super Utility Plus, TRSDOS 2.3 for the Model I, TRSDOS 1.3 for the Model III, LDOS 5.3 for the Model I and III, DOSPLUS 3.3 for the Model III, MULTIDOS 1.6 for the Model III, and NEWDOS80 for the Model I and III.
The main limitations involve not supporting options in the floppy disk controller’s FORCE INTERRUPT command. Since only drive timing programs used these options, this is unimportant. Another limitation is that the emulated drives appear to be spinning much too fast (perhaps 33,000 RPM!). Since most programs only checked for a lower limit of drive speed, this too is unimportant. Only programs that checked for a too fast drive speed will be affected. The format programs in TRSDOS 2.3 (and therefore the first versions of NEWDOS) did check for that in an effort to weed out hard-sectored disks (which have multiple index holes).
The character sets used in this emulator include all of the characters in the Model I and III character sets, with the exception of the Model III katakana characters. The emulator also supports the double-wide display mode. The emulated display uses exactly the same screen resolution (512 by 192 pixels) as a real Model III. This means that the screen display looks identical, except a little taller. The Model I, on the other hand, had a smaller screen resolution (384 by 192 pixels). In order to provide a readable emulated Model I screen size, the emulator doesn’t use the exact Model I character set. The character set it uses has all the same characters and looks similar to the character set of a real Model I, but uses more pixels in each character.
To install, create a directory for the Model I/III emulator and unzip the file TRSV11.ZIP into it. This directory should hold the ROM images needed by the emulator, and any virtual disk files you want to use. The ROM images are not included in this package because they are copyrighted by Tandy.
The emulator needs to find at least one of these three ROM files, named appropriately, before it will start:
Different ROM files are needed for Model I and III mode, because the hardware (and the features of the BASIC) differ substantially. If you do not have an appropriate ROM file, then you will be unable to switch into that TRS-80 mode. The ROM files can be either core-image files (a byte-for-byte dump of memory) or /CMD files. If the files are too long, then the excess will be ignored. If they are too short, then the extra space will be padded with zeros (but some ROM information will have been lost).
Extracting ROM images can be time consuming, but luckily only needs to be done once. For legal reasons, the ROMs are not included with the emulator. The best method, if you have a real TRS-80 with disk drives, is to use Disk BASIC to create the ROM file. For instance, if you are using LDOS on an actual Model III (or 4 in Model III mode), the following program:
10 OPEN “O”,1,“MODEL3/ROM”
20 FOR X=0 TO &H37FF: PRINT#1,CHR$(PEEK(X));: NEXT X
30 CLOSE 1
will create a copy of the Model III ROM as MODEL3/ROM. This file will work fine if transferred to the PC. On the Model I, use this program:
10 OPEN “O”,1,“MODEL1/ROM”
20 FOR X=0 TO &H2FFF: PRINT#1,CHR$(PEEK(X));: NEXT X
30 CLOSE 1
Of course, there must be enough room on an available drive to hold the file. You will then need a means of transferring the file from the TRS-80 disk to MS-DOS, such as an RS-232 transfer or a modified parallel cable transfer.
If you have already tried another Model I emulator and have already extracted the Model I ROM, you can simply rename the ROM image file to MODEL1.ROM and use that. Also, the MODELA/III file present on most TRSDOS 6 or LS-DOS 6 master disks will work as a Model III ROM if transferred to the PC and renamed MODEL3.ROM.
You must have at least one ROM image in the emulator’s directory or it will exit with an error. To start the emulator, just type TRS at the MS-DOS prompt. The first time that you run it, the emulator will calculate your machine speed and create a configuration file, TRS.CFG. On successive runs, it will read the speed and other options from the configuration file.
After the emulator displays the startup screen, it will wait for you to press a key. After you do, the virtual TRS-80 will start up ROM BASIC, just as a real Model I or III with no disk drives would. At this point, you can change any of the defaults or put disks in the virtual drives. Any changes that you make to the defaults will be saved in the configuration file. If you want to leave the emulator, press SHIFT-F7 to exit.
Operating the emulator is pretty simple, and only a few keys are needed to control it. Here is a list of the keys that affect emulator operation:
| F7: | Invokes the built in debugger. If you accidentally invoke the debugger, type G and ENTER to return. |
| F8: | Displays the virtual disk menu. |
| F9: | Displays emulator options menu #1. |
| SHIFT-F7: | Exits the emulator. You will be prompted before exiting. |
| SHIFT-F8: | Resets the machine. This acts the same as the orange reset button on a Model III, or the optional reset button on the Model I. Actually, it is better than the Model I reset button, because it also resets the virtual disk controller. This is helpful when using double-density disks. |
| SHIFT-F9: | Displays emulator options menu #2. |
The other keys on the PC keyboard are mapped to appropriate TRS-80 keys. This means that most of the keys will do what you expect, unless you are using the TRS-80 keyboard layout (which is explained later). The following keys have special mappings:
| F10 and ESC: | BREAK |
| ALT and HOME: | CLEAR |
| BACKSPACE: | Left arrow |
| CAPS: | SHIFT-0 (zero) |
One of the biggest differences between the PC keyboard and the TRS-80 keyboard is the shifted number values. For instance, SHIFT and 8 on a PC generates an asterisk (*), but on a TRS-80 it generates a left parenthesis [(]. One way around this is to use the TRS-80 keyboard layout. Another is to use the numeric keypad. With the NUMLOCK state on, pressing a key on the numeric keypad will generate a number. But if you press SHIFT and a number on the keypad, the result will be the same as if you pressed SHIFT and a number on the TRS-80 keyboard. For instance, pressing SHIFT and 8 on the numeric keypad will generate a left parenthesis [(], just like a TRS-80.
The emulated computer is equipped with 4 double-sided, double-density, 80 track virtual disk drives. These drives can either be empty, mapped to a virtual disk, or mapped to a PC drive. If no disk is in drive 0, then the disk controller is disabled. This is why the emulator will come up in cassette BASIC when all drives are empty; BASIC thinks that no disk drives are installed. The emulator can use two types of virtual disk formats. For more information about these formats, and about using a PC drive to read TRS-80 disks, see Virtual Disks and TRS-80 Disks.
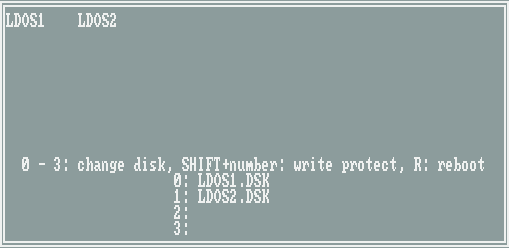
Pressing F8 invokes the virtual disk menu. At the top of the menu, all virtual disk files are displayed. At the bottom of the menu, all four virtual drives are listed along with the filenames of the disks they contain and the disk write protect status. To toggle the write protect status of a virtual drive, press SHIFT and the number of the drive. To remove a disk from a virtual drive, type the number of the drive, then press ENTER. The drive entry will become blank. To put a new disk in a virtual drive, type the number of the drive, then the filename of the virtual disk file. If the virtual disk file is already being used by another drive, then the request will be ignored. If the file is found and is not in use, then that virtual disk will be mounted in the virtual drive. If the file is not found, then you will be prompted to create it. If you do create it, remember that you are creating a blank, unformatted virtual disk. It will need to be formatted before you can use it. To exit the virtual disk menu and reboot the virtual computer, press the R key.
To use a TRS-80 disk in a PC drive, follow the same procedure for typing in a new virtual disk filename, only use A: or B: instead of the filename. This will automatically map all references to the TRS-80 drive to the PC drive instead.
To exit the virtual disk menu without rebooting, press ESC. If you have changed the system disk in drive 0, then you should press the R key to reboot the virtual machine. The virtual disks in the drives of the Model I are different from those in the virtual drives of the Model III. This allows you to have different boot disks for each machine mode.
Remember to treat virtual disk files with the same care as real disks. In other words, don’t swap virtual disks while the virtual drives are being accessed, and don’t remove the system disk from virtual drive 0. Remember also that if you are using double sided disks in Model I mode, do not put a double sided disk in virtual drive 3. This is an idiosyncrasy of the Model I design and NOT in the emulation!! This arises because of a conflict between selecting drive 3 and selecting the second side of a disk.
Emulation of any computer that has disk drives always presents a problem. It is rarely practical to have an emulator use actual disk drives. Since most PC compatible computers these days don’t even have a 5¼″ drive, it is impractical to rely on real TRS-80 disks. Also, the disk controllers used in the TRS-80 (Western Digital FD1771 and FD1793) and the disk controller used in the PC (compatible with an NEC PD765) are very different. Almost all PC disk controllers are incapable of writing single-density disks, and very few are capable of reading them. Furthermore, many early TRS-80 operating systems formatted disks in a manner that renders at least one sector unreadable by a PC disk controller. To top it all off, some PC controllers (especially in very recent machines) are unable to read TRS-80 disks at all.
To get around these problems, most emulators use virtual disk files. These files contain the information found on a real disk, but they are instead stored on your PC hard drive. This emulator can automatically recognize one of two types of virtual disk files. The first type is a very simple single density, single sided only format. It is useful primarily for compatibility, since several Model I emulators, including those by Jeff Vavasour and Yves Lempereur, only support this format. The other type was created by Jeff Vavasour to support double density, double sided disks in his Model III/4 emulator. This format can support all standard TRS-80 double-density and single-density disk formats. For that reason, the emulator uses this virtual disk type whenever it creates a new disk.
The other type of disk format supported by the emulator is actual TRS-80 disks. This requires that you have a floppy disk drive that can read your TRS-80 disks, generally a 5¼″ drive (which are increasingly rare). When this option is used, the emulator will convert all disk accesses by TRS-80 programs into commands for the real PC disk controller. This format is virtual in the sense that the two controllers work in a very different manner, and a great deal of conversion must be done.
This method works quite well, and you can even boot most operating systems using it. There are a few limitations, however. All of the problems mentioned earlier still apply. Oddly enough, the TRS-80 disk controllers were actually much more flexible than those used in PC compatibles. This lack of flexibility results in the occasional lost first sector (on some disks), and the inability to read any sector that has deliberate errors (used for copy-protection). This, plus the lack of single density, means that most self-booting or unusual format disks can’t be read at all. However, disks formatted by any later TRS-80 operating system (such as LDOS 5.3) should work just fine.
The other limitation involves your PC disk controller. Accessing a TRS-80 disk requires direct programming of two low-level controllers, which tends to bring any hardware incompatibilities to the surface. If the emulator can’t read TRS-80 disks on your computer, remember that it is a fault of the hardware, not the emulator itself. Hard as it may be to accept, there are very few adjustable settings in the PC disk controller, and no amount of “tweaking” the software will ever make it possible to read the disk. The only solution is to try other machines until you find one that can read the disk.
If this all sound a bit offputting, just remember that some machines will be able to read real disks, and others won’t. Use common sense and don’t try it out with your only copy of an irreplaceable disk. Also, if you don’t want to write to a disk, put a write protect tab on it.
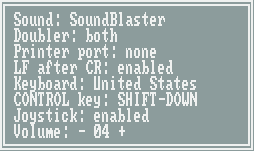
To change the state of the options in this menu, press the first letter of the option. To discard your changes and exit the menu, press ESC. To keep your changes and exit the menu, press ENTER.
Sound —
Many TRS-80 games used the casssette port to generate sound, which then could be routed to an audio amplifier. This option controls the cassette port sound output. There are three settings: disabled, PC Speaker, and SoundBlaster. The disabled setting simply ignores all sound output. The PC speaker setting routes all sound to the PC speaker. This provides good sound with most games, even though the speaker is capable of one fewer sound level than the TRS-80 cassette port. The SoundBlaster setting provides the best sound by routing all sound to the SoundBlaster speakers. This provides sound that is almost identical to a TRS-80 equipped with an audio amplifier. A SoundBlaster compatible card is of course required to use this setting. The volume level of the SoundBlaster is controlled by the Volume option in this same menu.
Doubler —
This controls the type of doubler that is emulated, but only affects Model I mode. There are four settings: none, Percom, Radio Shack, and both. The none setting turns off all doubler support. The both setting emulates both Radio Shack and Percom doublers at the same time. This is possible because the command sets are very different. The Percom and Radio Shack settings emulate only that specific doubler. This is needed for only a few programs, such as Super Utility Plus, that send simultaneous but conflicting commands for both types of doublers.
Printer port —
This controls where TRS-80 printer output is routed. The none setting discards all printer output; however, the TRS-80 program doing the printing will think it was successful. The LPT1 and LPT2 settings route the printer to the appropriate PC printer port.
LF after CR —
This option only affects printing. There are two settings: disabled, and enabled. Most TRS-80 printers were set up to require only a CR (13) at the end of a line. PC printers require a CR (13), LF (10) combination to end a line. If this option is enabled, then the TRS-80 end of line convention will be converted to the PC end of line convention. If it is disabled, then no conversion will be performed.
Keyboard —
This option allows switching among keyboard layouts. At the moment, there are three settings: The first setting is TRS-80. This maps a rough equivalent of the TRS-80 keyboard onto the PC keyboard. This is useful if you want to play games or use programs that use combinations of keys that were close together on the TRS-80 keyboard. This layout uses the following special keys:
| [ (left bracket): | Left arrow |
| ] (right bracket): | Right arrow |
| TAB: | Up arrow |
| CTRL: | Down arrow |
All other keys map the same way that they would be positioned on a real TRS-80 keyboard.
The second setting is United States. This is the setting most people will want to use, because it maps the keys on a standard United States keyboard to their TRS-80 equivalents.
The third setting is German, which maps keys on the German keyboard to their TRS-80 equivalents. The ALT GR key can be used to select the third characters on the keys that have them. Any keys that produce symbols which can’t be generated by a real TRS-80 keyboard are ignored. Some other keys, such as the accented vowels, produce the codes that were commonly used for German language word processing. They look wrong on screen, but will print out correctly with the proper printer setup.
CONTROL key —
This option controls the function of the PC CTRL (control) key. There are three settings: SHIFT-DOWN, @, and Electric Pencil. The TRS-80 Model I and 3 had no control key, but a SHIFT-DOWN combination was used by many programs, including Level 2 BASIC, for that purpose. The SHIFT-DOWN setting makes pressing the CTRL key the same as pressing SHIFT-DOWN. The popular word processing program, Scripsit, used the @ key as a control key. If the @ setting is selected, then pressing CTRL will work the same as pressing the TRS-80 @ key. The Electric Pencil word processor used a different approach to the control key problem. It worked with an extra key that you could add to your Model I by installing a hardware kit. Selecting the Electric Pencil setting maps the CTRL key to that extra key.
Joystick —
This controls emulation of the TRS-80 joystick. There are two settings: disabled and enabled. The disabled setting turns off TRS-80 joystick emulation; the enabled setting turns it on. If enabled, PC joystick #1 emulates the Alpha Products joystick (the later version) and the Big Five TRISSTICK. The joystick is automatically centered when you enter the emulator, so it must be hooked up then. All fire buttons on the PC joystick are mapped to the one fire button on the TRS-80 joystick. Since PC joysticks are analog and the TRS-80 joystick was digital, this works better in some games than others. Just be sure not to move the joystick when starting a TRS-80 game. Many programs disabled the joystick if any movement was detected as they started, because they assumed it was a noisy expansion bus instead of a joystick.
Volume —
This controls the SoundBlaster volume. It ranges from 1 (lowest volume) to 31 (highest volume). Pressing – (minus) will reduce the volume, and pressing + (plus) will increase it. Note that this only affects the volume of the SoundBlaster sound output; the PC speaker has a fixed volume.
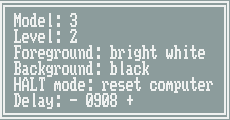
To change the settings of the options in this menu, press the first letter of the option. If you dislike your changes, press ESC to discard them. Otherwise, press ENTER to exit the menu.
Model —
This specifies the TRS-80 model that is emulated; 1 or 3. The program won’t allow you to switch to a model for which a ROM file doesn’t exist. Changing the Model setting will reboot the emulated machine. Changing to Model III mode is only possible with the registered emulator.
Level —
This specifies the level of the BASIC ROM that is used; 1 or 2. If you have no Level 1 ROM, then you won’t be allowed to switch into that mode. Switching the Level setting will reboot the emulated machine.
Foreground —
This cycles through the foreground colors that the emulator can display. Note that this can’t be the same as the background color. This option won’t work on a plain CGA adapter, but will work on EGA and up.
Background —
This cycles through the background colors that the emulator can use. Note that this can’t be the same as the foreground color.
HALT mode —
This changes the action of the HALT instruction (76H). There are two settings: reset computer and enter debugger. The reset computer setting matches the action of a real Model I, because HALT is wired to the Z-80 RESET pin. Some Model I programs use this instruction to reset the computer. The enter debugger setting will instead cause the emulator debugger to start. This is potentially useful to TRS-80 assembly language programmers.
Delay —
This controls the speed of the emulated machine. The speed is automatically gauged when the emulator is first run, but can be adjusted. To decrease the delay and thus speed up the emulation, use the – (minus) key. To increase the delay and slow down the emulation, use the + (plus) key. Note that the emulation does not use a different delay in Model I and 3 modes.
I wrote the built-in debugger primarily to help debug the Z80 emulation. However, it could be useful to assembly language programmers. If you are familiar with the commands used by most TRS-80 debuggers, then you should feel right at home. If you enter the debugger accidentally, just press F7 or ESC to leave. Here are the commands:
| D address/register: | Display memory at address or register address |
| U address/register: | Unassemble (disassemble) instructions at address or register value |
| + (plus sign): | Increase memory display by 128 (if not viewing register address) |
| – (minus sign): | Decrease memory display by 128 (if not viewing register address) |
| R register,value: | Change register to value |
| V: | View TRS-80 screen (pressing F4 at any time will also view the screen) |
| I: | Single-step next instruction |
| C: | Single-step next instruction or execute next CALL |
| G address/register,breakpoint: | Leave the debugger, transferring control to address or register address. If no address or register is specified, control is transferred to the address in PC. If a breakpoint is specified, then the debugger will restart when the breakpoint is reached. |
| E number: | Execute next number of instructions |
| H register/address: | Edit memory in hexadecimal starting at register or address. Press ESC to exit the modification mode. |
| A register/address: | Edit memory in ASCII starting at register or address. Press ESC to exit the modification mode. |
A new feature of version 1.10 of my emulator is hard disk emulation under LDOS. Like a real hard drive, this virtual hard drive must be formatted before it can be used. In this case, the MS-DOS file containing the hard disk image must be created. HDFORMAT.EXE (an MS-DOS utility included in the emulator package) performs the equivalent of a low-level and high-level format. The file it creates, HARDDISK.HDV, is pre-formatted for use with LDOS 5.3 for the Model I or 3.
To create your hard disk image file, just run HDFORMAT.EXE. It will automatically create an image that can store around 5 megabytes. The image file will start out fairly small, but will grow as you add TRS-80 files to it. As long as you don’t change the image filename, the emulator will automatically recognize and use it. If you want to create a larger or smaller hard drive, you can use the command line parameters to change the defaults (see below). Note: To have LDOS recognize the hard drive, you will also need to run HARD/CMD, the LDOS hard disk driver, from within the TRS-80 emulation. HARD/CMD is included with the emulator on the virtual disk UTILITY.DSK.
There are good reasons why HDFORMAT doesn’t default to creating the maximum sized hard drive of 13 megabytes. The specific details are complicated, but what it means is that the larger the hard drive, the greater the wasted space per file. In other words, on a 13 megabyte TRS-80 hard drive, every file will take up at least 8K, regardless of its actual size. This can lead to quite a bit of wasted space and can cause the hard disk image file to become unnecessarily large. By keeping down the hard disk size, you can drastically reduce the waste.
Another problem relates to the maximum number of files. All TRS-80 operating systems (not just LDOS) had a limit of 254 files per data disk. This meant that people with very large hard drives often found themselves with no more file slots, but plenty of free space still left on their drive.
One solution to this second problem was a program such as DiskDISK, which used to be sold by MISOSYS. DiskDISK created “virtual disk” files on a hard drive (much like the emulator does) and fooled LDOS into thinking that each “virtual disk” was a new disk drive. This method was not unlike today’s subdirectory systems and was an excellent way to beat both the 254 files maximum and the wasted space problem. (Wasted space was avoided because files within DiskDISK “virtual disks” were allocated using smaller units than files on the rest of the drive.)
Among other things, these options allow you to change the size of your hard drive:
| /? | Displays a brief help screen. |
| /V | Specifies the volume label to use when formatting the hard disk. The default is "HARDDISK". |
| /C | Specifies the number of cylinders (tracks) to be used with the disk. This number must be between 3 and 203. The default is 203. |
| /S | Specifies the number of sectors per cylinder. This number must be between 3 and 256. If it is greater than 32, then it must be a multiple of 32. The default is 96. |
| /G | Specifies the number of granules per cylinder. If you do not use this parameter, HDFORMAT will automatically calculate the the highest number possible (normally 8). The number of sectors per cylinder must be evenly divisible by the number of granules. |
| /D | Specifies the directory cylinder to be used with the disk. The default is 1, and you would not normally want to change it. |
If you want to create a 13 megabyte hard drive, then you should set the cylinders to 203 and the sectors to 256, like this:
HDFORMAT /C203 /S256
The TRS-80 virtual disk UTILITY.DSK has two TRS-80 utilities for use with the emulator. One of them is HARD/CMD, an LDOS hard disk driver. It provides the linkage between LDOS and the hard disk emulation. As an added bonus, it also sets the TRS-80 time and date. To install the driver, type “HARD” at the “LDOS Ready” prompt. This will install the driver and map the hard disk as drive 4. Remember that the hard disk image file, HARDDISK.HDV, must be present in the same MS-DOS directory as the emulator. HARD/CMD will only work under Model I and 3 LDOS.
HARD/CMD has three optional parameters. Any parameters should be enclosed in parentheses, and if you use more than one parameter, separate them with commas, like this:
HARD (DRIVE=5,QUIET)
| DRIVE | Specifies the desired hard drive number. The default is 4. |
| REMOVE | Removes the hard disk driver linkage. |
| QUIET | Hides all messages unless an error is encountered. This is useful if you run HARD/CMD as an AUTO command. |
The other utility on UTILITY.DSK is CLOCKSET/CMD, which will set the TRS-80 time and date. This program will work with all TRS-80 operating systems. Since HARD/CMD will also set the time, CLOCKSET/CMD is primarily useful if you don’t want to use a hard drive, or if you don’t use LDOS.
CLOCKSET/CMD has only one optional parameter, and again, if you use it, it should be enclosed in parentheses:
| QUIET | All messages are hidden unless an error is encountered. This is useful if you run CLOCKSET/CMD as an AUTO command. |
Registered Version — $29.00
Includes these extra features not available in the shareware version:
TRSREAD and TRSWRITE work with all major TRS-80 operating systems, both single and double density, and work with both virtual disks and physical TRS-80 disks in a PC drive (if your hardware can support it).